
Crafts and Words by Flower City Bitties founder, Lauren Harrison; Photos by Olivia Bauso
We've almost reached the peak of Fall foliage in Rochester, which can only mean one thing: it's time to fill our homes with as much of Fall as possible! Hold onto the best time of year with some fun DIY decor, brought to you by Flower City Bitties' own Lauren Harrison.
Wine Cork Pumpkins

What you'll need:
25 Wine Corks (I used a variety of synthetic and cork)
Hot Glue Gun and 5 Hot Glue Sticks
Acrylic or Enamel Paint (All orange or a variety, as you'll see here)
Cotton Balls or Paint Brush

How to create:
- Lay the corks vertically, so you can see the shape of your pumpkin as you're building it.
- Work from the bottom up, start with 4 corks in the bottom row, 5 corks on the next row, 6 corks on the 3rd row, 5 corks on the next row, and finally 4 corks on the top row. You are not gluing yet, but getting a sense for which corks would look best where.
- Decide if you're going to paint all of the corks or paint randomly, and also what color(s) you're going to use. I decided to leave the wine-stained corks as is and use a combination of orange and white paint in a random pattern.
- Once the paint on your corks has dried, you are ready to begin gluing with the hot glue gun and glue sticks. Work your way from the bottom up, leaving the corks sitting vertically on your work surface as you go. If you have E6000 use this WITH the hot glue for a more permanent hold.
- Then take your last cork and glue it at the top of your pumpkin. You can decide if you want to leave the entire cork for a longer stem or if you'd like to cut it a bit shorter. I left mine longer!
- Finally, add an accent ribbon or embellishment around the cork 'stem' of your pumpkin! You could even add Spanish moss or decorative leaves!
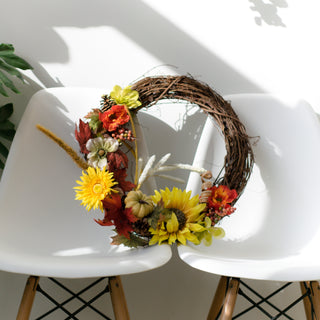
Fall Grapevine Wreath

What you'll need:
1 14” or 18” Grapevine Wreath (Find a coupon from Michaels!)
3 Silk Flower Bushes, in varying colors and styles
Hot Glue Gun and 10 Hot Glue Sticks
Ribbon or Jute (for hanging/mounting)
Optional: Greenery picks, and seasonal accent pieces like mini pumpkins, acorns, and gourds

How to create:
- Remove the silk flower heads and a variety of leaves from the bushes.
- With the wreath laying flat, begin placing the flowers along the left side of the wreath (do not glue); You are only covering one half of the wreath.
- Add leaves in to surround each flower and add dimension- you can cut the leaves apart for easier placement.
- Once the entire left side of the wreath is saturated with flowers, leaves, and any accent pieces you can begin gluing.
- Start at the bottom and work your way up, gluing one piece at a time to ensure proper placement.
Note: Keep in mind the rule of 3’s when decorating and place leaves in clusters of 3 for a more refined look. This also applies with the silk flowers, select 3 flower heads from each bush to place on the wreath, although they do not need to be placed together on the wreath.
Whimsy Pumpkins

What you'll need:
3 Craft Pumpkins (Dollar Tree or Michaels has these)
Rustoleum Ivory Spray Paint
Rustoleum Gold Spray Paint
Painters Tape
Chisel Tip AND Fine Tip Paint Brushes
Ivory Acrylic Paint
Black Acrylic Paint
Gold/Copper Acrylic Paint (Some gold paints are very yellow, so copper looks nice too!)

How to create:
- Spray all three pumpkins with 1-2 coats of the ivory spray paint, let dry for 24 hours OR use a blow dryer to expedite this process.
- Decide which patterns you want; standard is 1-Stripe, 1-Checkered, 1-Dot
- Decide if you want any gold tops, as pictured. If so, cut strips of painters tape in wavy pattern and place about 4” down from the top of the pumpkin. Use the gold spray paint and spray 1-2 coats ONLY ON THE TOP. You may have to cover the bottom portion to avoid overspray.
- You may only want a gold stem, if so remove the stem(s) and spray paint them gold (or cover the pumpkin ‘body’ and spray just the stem)
- For the Checkered pattern, use the black acrylic paint and paint squares down each section of the pumpkin; be sure to truly ‘checker’ them as you paint. Lines can be a bit wavy, that is the whimsy look. You can use ivory acrylic paint to touch up any imperfections.
- For the Striped pattern, you can free hand paint the stripes in black or gold/copper on alternating divots OR you can painters tape off alternating divots to ensure straighter lines.
- For the dots, decide which color dots you’d like (gold or black) and use a paintbrush to paint them on; a variation of sizes looks best.
Flower City Bitties was founded in 2015 with the love of creative expression in mind. Using their passion for crafting and creativity, they bring accessible and fun crafts to everyone from novice to seasoned crafters looking to enhance their personal craft collections. With a background in teaching and creativity, Flower City Bitties makes all crafting experiences fun and enjoyable!
After you've tried Lauren's crafts at home, join her IRL at Rochester Brainery for one of her fabulous upcoming crafty classes. Lauren will be teaching Make Your Own Beer Coasters on November 3, Fall Wreaths on November 13 and two Christmas-themed classes in December.